We've had a few customers asking lately about integrations with Terraform and Azure DevOps. This blog is going to provide an example of how you could use Terraform and Azure DevOps together to deploy infrastructure in GCP. Now, to share an opinion, I think there are better options out there. But depending on how invested an organization is with Azure DevOps, this could be a great approach for them. Side note, this is not intended to be a step-by-step guide, but there should be enough information to piece it together.
The Goal
Use Terraform and Azure DevOps to deploy infrastructure in GCP (because we can, and someone told me we can't). Additionally, Azure DevOps should be able to consume the terraform in a way in which a repo can be reused across environments, changing specific environment variables, not the code itself. Once the pipelines are created, we'll use Terraform to deploy a Google Storage bucket and then a Google Compute VM.
The Setup
- Create an Integration Pipeline
- Create a Release Pipeline
- Deploy to a GCP Project
Azure DevOps Project Settings
In Project Settings we need to set up Service Connections. Two connections will be needed; one for GitHub and one for GCP*. Creating the GitHub Connection is straightforward and can be set up using an OAuth app in GitHub, or using your GitHub personal access token. For the GCP Service account, for demo purposes, we've given this a broader range of access than you would in a production scenario. At a minimum, you will need to have grant Storage Object Admin and Storage Object viewer to be able to initialize the terraform backend.
*There are a couple of ways to solve for the necessary GCP connection. In my opinion, this way is the easiest but not the best. Another option would be to make use of Azure DevOps secure file library and download the account as part of your release pipeline. Still not ideal since you need to store the JSON key and manually rotate it, but the connection would be only be invoked as needed, and not generally available to your pipelines. The last, and in my opinion best solution, would be to look at integrating with Hashicorp's Vault and using dynamic secrets - removing the need to generate and store a service account or service account key within your CICD pipelines at all and having those secrets only exist for the actual run of the releases.
Here is a quick look at how to set up the GCP Service connection, since it may not immediately be obvious. In my opinion, this is unnecessarily complicated and I am not clear on why Microsoft did not just create an import function that would let you upload the JSON file as-is, instead of asking users to break open the JSON file to extract data. In Project Settings, go to Service Connections and search for 'GCP for Terraform'.
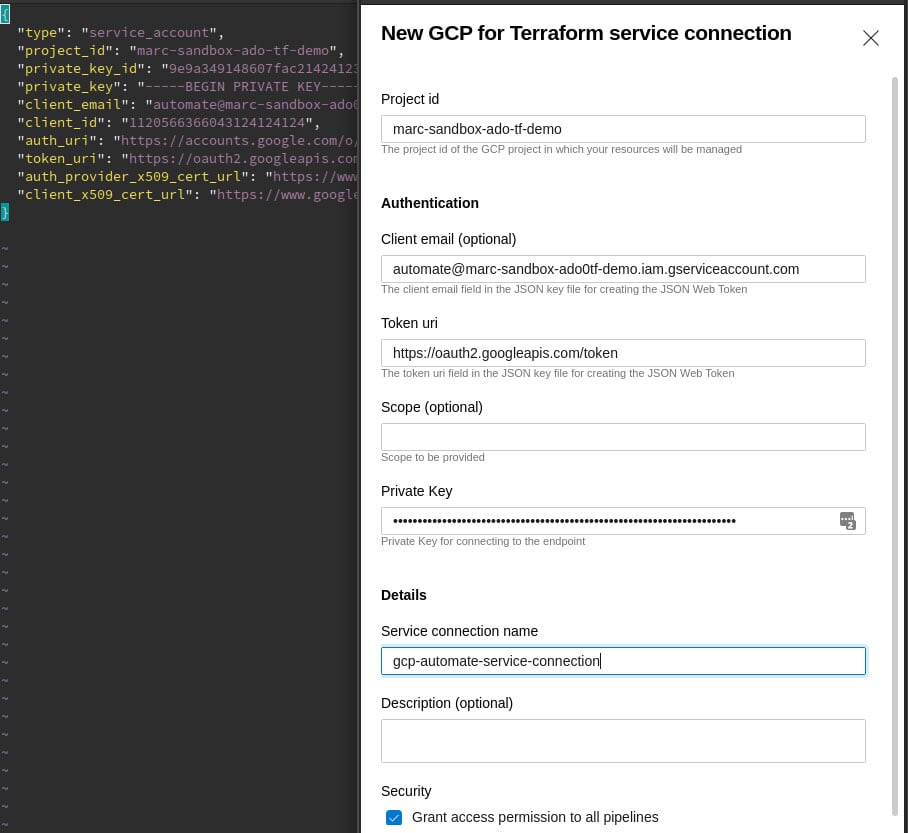
Side by side example of mapping json properties to Service Connection setup
Create the Integration Pipeline
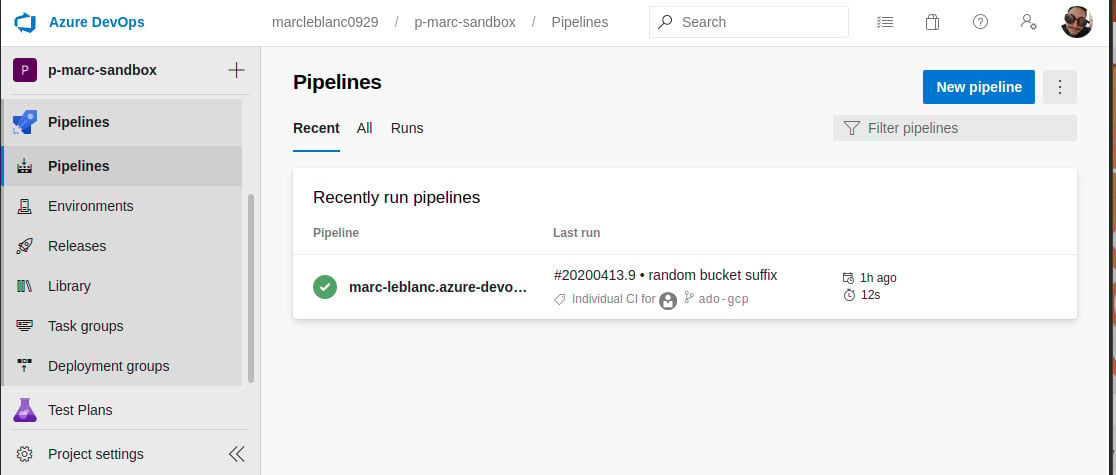
The integration pipeline for Terraform in this example is very straight forward. All we have it doing is grabbing the terraform directory from the repository, and publishing it as an artifact for consumption in the release cycle. When you create the Pipeline, it will allow you to select a repo from GitHub based on the Service Connection you created in Project Settings. For this example, I have a simple repository set up with the following structure:
azure-pipelines.yml
By default, this pipeline will trigger a new build when there is a new commit to the ado-gcp branch.
Release Pipeline

Once you have your integration pipeline defined, next you need to define your release pipeline. The first thing to do when creating the new release pipeline is to associate an artifact to the release. Set the source pipeline to the integration pipeline defined previously, select Latest as the default version and accept the default source alias. Next will be to add the tasks. For tasks, select start with an empty job template when prompted. For this release pipe, we will have 1 Job with 5 tasks.
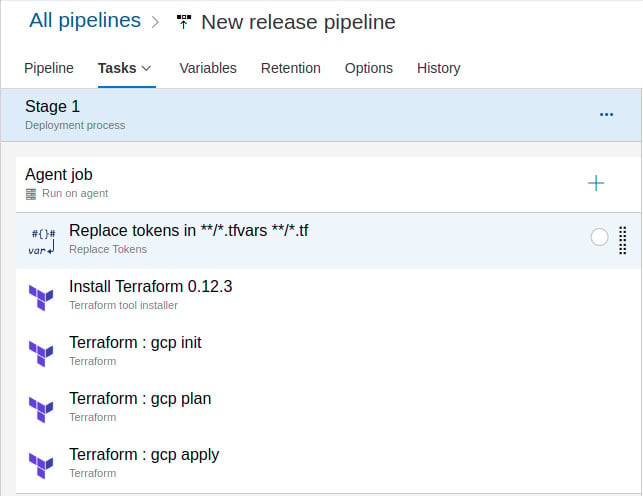
Jobs
- Agent Job (run on an agent - default settings OK for this scenario)
Tasks:
- Replace tokens in terraform
- Install Terraform
- Terraform init
- Terraform plan
- Terraform apply
Each of these tasks has some configuration.
1. Replace tokens in terraform To keep the repo as generic as possible and reusable across environments, we have tokenized some aspects of our code that get updated accordingly on a release. For example, we are going to have this terraform create a Google Cloud Storage bucket are setting the name in a variable on the release pipeline. The corresponding value in the terraform.tfvars looks like this:
To set this up:
- Install the Replace Tokens task
- Target files **/*.tfvars and **/*.tf
- Under Advanced, update Token prefix and suffix to __
2. Install terraform To set up this task, search for 'Terraform tool installer task and add it. Once added to the task list, simply set the version to the terraform release you wish to you. We have selected 0.12.3 for this example.
3. Terraform Init, Plan and Apply These 3 tasks all stem from the same task. Search for and add the Terraform task written by Microsoft. It will need to be added 3 separate times.
Configuration Common to all:
- Set the provider to gcp
- Update the Configuration directory to $(System.DefaultWorkingDirectory)/_your_source_alias/drop/terraform. In our example this works out to $(System.DefaultWorkingDirectory)/_marc-leblanc.azure-devops-sample-tf/drop/terraform. The /terraform lines up with the downloaded directory from the repo.
- Set the Google Cloud Platform connection to the service connection previously defined
Specifics
- On the first Terraform task, change the command to init. Set Bucket to $(gcs_backend_bucket) and Prefix of state file to $(environment)
- On the second Terraform task, change the command to plan.
- On the third Terraform task, change the command to validate and apply. Add --auto-approve to Additional command arguments
Super Important Side Note When you set up the Terraform init task, it feels like you are setting up the backend as well. This is incorrect. I am not sure why Microsoft has done this, but if you do not include a backend definition in your Terraform code, the state will be initialized locally on the release pipeline build agent. The second the job completes, the state is lost, and your overall state is sharded. For convenience, take a look at the backend.tf I am using in this project.
Variables Now that the job and corresponding tasks are set up, the last thing to create are the variables. On the tab to the right of Tasks, you see Variables. Click that and here are the variables we need to set up.
| Name | Value | Description environment | dev | Prefix for Terraform state. This is consumed by the GCP Init Task. Recall we set a $(environment) value gcp_project_id | marc-sandbox-242022 | GCP Project ID. This is consumed by Terraform GCP resource and will appear as a tokenized __gcp_project_id in the Terraform code gcs_backend_bucket | marc-sandbox-tfstate | GCS Bucket for Terraform state. This is used by the GCP Init task and fills in the $(gcs_backend_bucket) value. gcs_bucket_admins | my email | This a bucket admin to be applied during a GCS bucket created by Terraform. It is set up in terraform.tfvars as __gcs_bucket_admins__ and will be replaced by the Replace Tokens task gcs_bucket1_name | marc-sandbox-bucket | A bucket that will be created by Terraform and shows up in terraform.tfvars as __gcs_bucket1_name TF_LOG | DEBUG | (Optional) To get more verbosity from Terraform and help preserve your sanity while troubleshooting, you can set the TF_LOG variable which will automatically be created as an environment variable. More info https://www.terraform.io/docs/internals/debugging.html
Stitching it all together
So now we have an integration pipeline that triggers when commits are merged into a specified branch, a release pipeline that sets up the code for a specific environment using environment variables, and the code committed into the branch is 100% reusable without modification. All that is left now is to set up the release pipeline to trigger when the integration pipeline is complete. So what does this mean exactly? A developer can work on a local branch - say new-infra-component-widgets, now that they have it ready, they submit a pull request to the main pipeline branch, in our case here, ado-gcp. The pull request is approved by an appropriate role holder and is merged in. The integration pipeline picks up the changes and spins off a new build - in this case, consisting only of newly minted terraform code, stripped of any environment identifiers. Once the artifact is successfully published by the pipeline, the release cycle is triggered and creates a new release for deployment, flowing through the tasks in the agent job, thus resulting in terraform-managed infrastructure deployed with an end-to-end Azure DevOps backed solution for CICD.
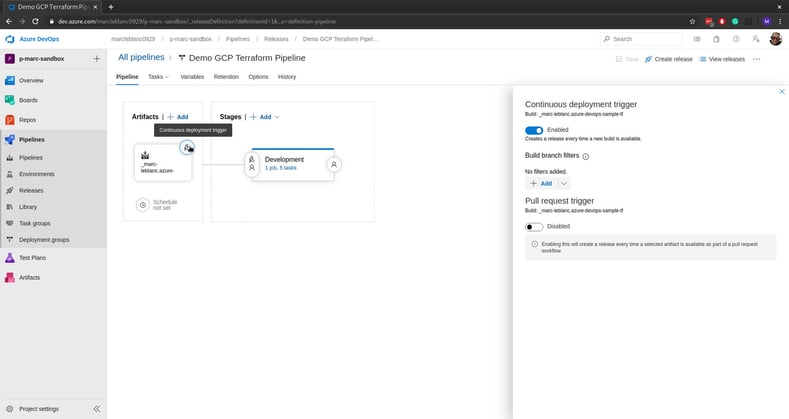
Ok, wait, back up, the final pieces. Once the release pipeline is built and tested, to fully automate it there is one final thing to configure, the Continuous Deployment Trigger. For this scenario, we simply enable it.
But wait! There's More!
I feel like I've used this in a blog before, but there really is more! Ok great, we have an awesome automated CICD pipeline, cool. Let's think about extending this just a little further. I am just going to drop a couple of breadcrumbs here, but recall how I've been mentioning I want the repo code to be 100% reusable regardless of the environment? And recall how the environmental variables were set on the Release job level? Well, what if instead, our Release Pipeline looked like this, with each Stage having set pre-conditions before allowing that release to flow further up the chain. A single build artifact, unmodified, and configured for each specific environment along the chain.
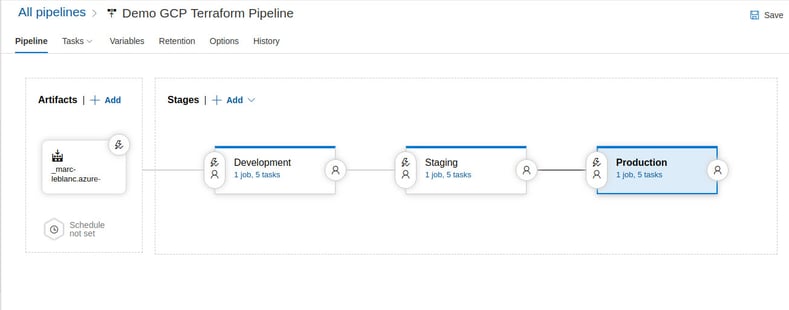
Again, I don't feel this is the best way to get this result, but it is certainly a viable approach if Azure DevOps is in your wheelhouse and you want to manage infrastructure with Terraform in GCP.
Want to see this in action? Check out the video below:
December 14, 2023

